Pregnancy may be the most powerful transformation you go through in your life as a woman! Your body is rapidly changing, hormone levels are increasing, and emotions fluctuate dramatically. Yoga can help you stay present and accept these remarkable changes with awareness, patience, and respect.
As the belly expands to accommodate baby, the extra weight in the front can create an overarching of the lower back which can affect breathing and create tightness in the hips and back pain. Without body awareness, poor posture habits can be formed, which then accentuates the problems.
Developing an awareness of posture through yoga can make a big difference and the practices can alleviate some of the discomfort associated with pregnancy.
These four yoga poses encourage physical balance, mental focus, and a state of calm. Remember, you never want to strain, overstretch, or compress the belly in any way, so keep those things in mind as you practice. Enjoy!
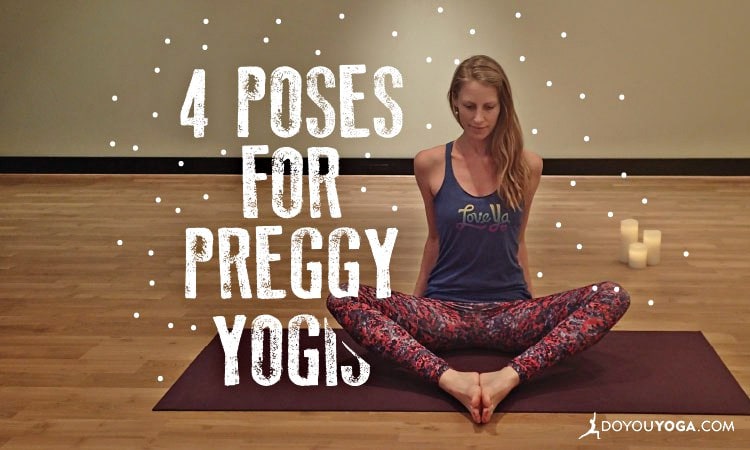
1. Bound Angle Pose (Baddha Konasana)

This is one of the classical prenatal yoga postures. It helps open up the hips and stretch the muscles of the groin, two areas that can become tight throughout pregnancy. It’s also a very grounding pose that can centre you if you’re feeling a little scattered.
- From Easy Cross-Legged, take the soles of the feet together, drawing them as close to the body as you can comfortably manage, while being respectful to your body.
- Hands can be on the ankles, feet, or lower legs, or next to the hips to help create more length in the spine (pictured).
- Press down evenly through both sit-bones, feeling the connection with the ground beneath you and the length in the spine all the way up to the crown. You can also lean forward a little, which may increase the intensity in the groin and hips, but leave plenty of space for your belly (no squishing baby!).
- Stay for 5 breaths, or more if that feels intuitively good. When ready, slowly come out of the pose.
2. Warrior II on Chair (Virabhadrasana II)

Warrior II opens up the hips and builds leg strength. This version is particularly useful in the third trimester when energy levels are slightly lower. By resting the sit-bones on the chair, you can still enjoy the hip opening with a much reduced level of effort required in the legs.
- Takinga wide-legged stance over a chair, turn your left toes 90 degrees, facing the short edge of your mat.
- Turn your back toes in and press the outside edge of the back foot into the mat. Lift the inner arches and allow your sit-bones to rest on the chair so your hips are even (you might need to adjust the length of your stance for that to happen).
- Bending your left knee so that it’s stacked over the ankle, float your arms up to shoulder height. If there’s any tension around the shoulders, neck, or jaw, let go as much as you can with every exhalation.
- Gaze softly over the left fingertips , staying for about 5 breaths before repeating on the other side. If you feel like resting between doing the left and right side, the chair’s right there!
3. Crescent Lunge (Anjaneyasana Variation)

Sitting for long periods can shorten and tighten the hip flexors, particularly the psoas. This simple Low Lunge can help lengthen these muscles, which can leave you feeling freer around the front of the hip and create more length in the spine.
- From hands and knees, step one leg forward so the ankle is directly underneath the knee.
- Make sure you have plenty of room for baby. If you are in your third trimester, you may need to take your front foot out to the side more to accommodate your belly.
- For your back foot, you can have the top of the foot pressed to the mat, or you can tuck your toes under. Try both to find what feels best for you..
- If you’re overarching in your lower back, lengthen the tailbone down toward the ground and subtly draw the front of hipbones back toward you.
- The chest stays open, heart space light. You can rest both hands on the thigh of the front leg.
- Use the breath to help the muscles let go by sending the exhalation in to the areas of tightness. Stay for 5 breaths, then come back to hands and knees and repeat on the other side.
4. Goddess Pose (Utkata Konasana)

Tight in the groin or inner thighs? You’ll really feel this one! Goddess Pose can be a greater challenge than floor-based poses because of the added force of gravity. Practice this pose using the breath to deal with intense physical pregnancy sensations.
As you consciously breathe into the areas you feel the sensations, you learn to relax the body and focus the mind. You could say this pose is a mini prep for labour (I said mini…).
- Facing the long edge of your mat, take a wide stance, about a leg length. Turn your toes out toward the corners of your mat.
- Notice where your knees are pointing. Open them toward the little toes in a way that doesn’t force or overstrain your groin.
- Lengthen the tailbone down toward the ground while the crown of the head draws and lengthens upward.
- Feeling lightness in the heart space, take the palms together in Anjali Mudra to focus your breath and your mind and enjoy the experience.
- Stay for 5 breaths—more if that feels intuitively right.
Relaxation between poses is great, particularly if your energy levels feel a little low. Off the mat, relaxation practices like yoga nidra and breath awareness will serve you and baby in a really positive way, so take the opportunity as often as you can!