Upward Plank pose, also known in Sanskrit as Purvottanasana, is loosely translated as “intense Eastern stretch,” representing the deep stretch across the front (Eastern side) of the body. While it can be neglected in many vinyasa classes in lieu of more popular poses such as Plank and Chaturanga, Upward Plank is a wonderful counterpose for such strengthening poses.
This is because it stretches out many of the muscles that are worked in Chaturanga. In addition, Upward Plank offers the benefits of a heart-opening backbend without the deep extension of the spine, making it a great preparatory pose for backbending postures.
Benefits Of Upward Plank Pose
Upward Plank pose strengthens the arms, wrists, and legs, and stretches the entire front body, as well as the shoulders and ankles. Practicing this pose can help tone the hamstrings and the triceps, and can be therapeutic for fatigue. In sequencing, Upward Plank is the perfect counterpose for Chaturanga, as well as deep forward folds such as Paschimottanasana.
Step-By-Step
- Begin seated in Stick Pose (Dandasana), with both legs extended straight out in front of you and your feet flexed and active.
- Plant your palms down on the ground beside your hips, keeping your arms straight and your fingertips facing toward your toes, then walk your hands back several inches. Ensure the hands are no wider than shoulder-distance apart, and ground down firmly through the knuckles of the fingers.
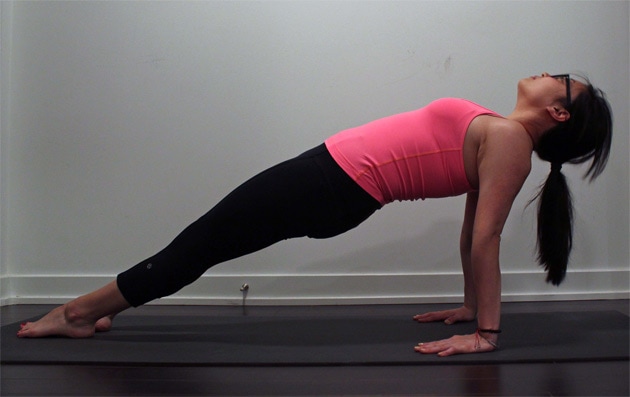
- Bend your knees and plant the soles of your feet down on the mat. Ensure that the feet are parallel and no wider than hip-distance apart.
- On an inhale, begin to lift your hips up toward the ceiling, pressing into your hands and feet. Find a reverse tabletop shape with the body, with the torso and thighs approximately parallel to the floor and the arms and shins approximately perpendicular.
- While maintaining the lift in the hips, work toward straightening your legs one at a time so that the soles of the feet are making full contact with the mat.
- Press your shoulderblades into your back, allowing the chest to lift, and find a straight line of energy along your entire body, from your feet through to the crown of your head. Maintain an even sense of softness and strength through the front and back of the body.
- If it feels comfortable and appropriate for you, slowly drop your head back without compressing the back of your neck.
- Hold the pose for 5-10 breaths, then sit back down in Dandasana on an exhale.
Tips
- For an added challenge, try coming into the pose with the legs fully extended. Begin seated in Dandasana with the legs together and the feet flexed. Plant the palms and inhale to lift the hips and bring the soles of the feet flat down onto the mat.
- Those with wrist or neck injuries should practice this pose with caution. With a neck injury, avoid hanging the head back and instead support the head on a wall or keep your gaze upwards and your shoulders away from your ears.
- If it feels too difficult to come into the full expression of the pose, continue to practice reverse tabletop to build strength and stability.