As with many arm balances, the key to peacock pose revolves around finding a specific balance point. And since we all have different body proportions, with weight distributed in different areas, the balance point for this posture will change from person to person.
This makes peacock pose a great example of a yoga posture that ends up being unique to the practitioner—there is no “perfect” alignment. In order to find your variation of peacock pose, you simply have to play around with your weight until you find that sweet spot. Here are a few tips to get you going.
Before You Start
As with any posture you are working on, it’s best to attempt it in the context of your regular yoga practice. The body will be best prepared if it’s had a chance to warm up through a little bit of stretch and flow.
If you’re short on time, you can just do a few Sun Salutations in order to warm up the wrists.
Peacock pose requires a lot of external rotation through the shoulders as you bring your elbows together at the midline of the body. If you struggle with flexibility in the shoulder region, you should spend an adequate amount of time trying to open that area of the body first, since tightness can prevent you from getting your arms in the right place.
Stretching the Wrists and Arms
 Taking Eagle (Garudasana) Arms is a great way to stretch out the posterior aspect of the shoulder, as well as the rotator cuff muscles. Find yourself in a comfortable seat and then take your right arm underneath your left—crossing at the elbows and wrists, and then bringing your palms to touch.
Lift your elbows up in the line with the shoulders and hold for at least five breaths. Repeat on the left side.
 The wrists as well will need to be adequately stretched before you try this arm balance, especially because putting weight on the hands with the fingers pointing backwards is not a position we often find ourselves in.
Come into a kneeling position and then place your palms on the floor in front you with the fingers facing your knees. Keep the heels of your hands on the ground and start to draw your weight back to find the stretch through the forearms.
Getting Into the Balance with Variations
This posture is substantially easier if you make yourself a little bit more compact, so if you can comfortably get your legs into a lotus position, I recommend trying this variation first.
Lotus Variation
 Take the little toe side of each foot and draw it into the opposite hip crease for Lotus Pose. If this isn’t possible for you, you can also do this from a regular cross-legged seated position (though it may be more difficult to keep your legs in this shape as you move into the balance).
• Roll your weight forward and come onto your knees while keeping your feet in the same position.
• Draw your elbows together and place them into the belly below the ribcage. Ladies—you’ll need to scoop your ladies up with your inner arms so that you can fit your elbows comfortably below them.
• Place the hands on the floor with the fingers pointing backwards—don’t forget to spread the fingers wide so you can distribute the weight more broadly. Your little fingers should meet in the middle.
• Take your weight forward until you can begin to draw your legs off the ground. You’ll find yourself in a bit of a teeter-totter until you can distribute the weight evenly. Don’t be discouraged if you don’t get it right away! You may have to play with bringing the elbows a little higher or lower on the belly in order to find the right spot.
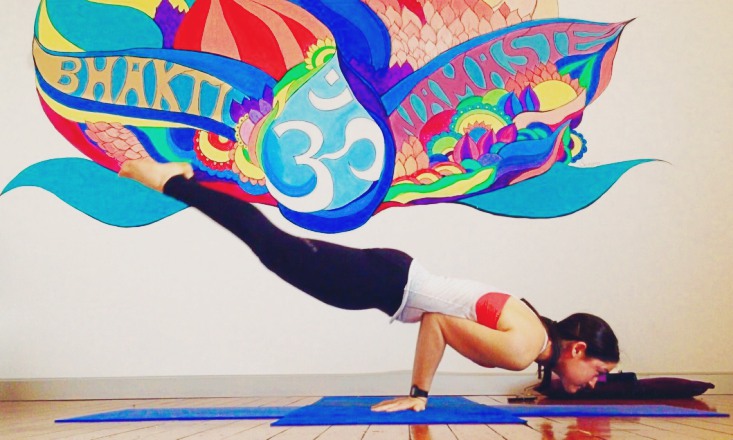
Straight Leg Variation
Peacock Pose with straight legs can more challenging because you are working with a longer lever. You need to keep your entire body engaged, particularly your core and your legs.

Start in a kneeling position with the knees wide (like in Child’s Pose). Place the hands on the floor as in the first variation and lean the weight forward until you can gently take your legs up off the floor.
• When you feel balanced enough, start to straighten your legs behind you and draw the inner thighs together. Your glutes, inner thighs, and quadriceps need to be very much engaged here in order to prevent the weight from toppling backwards.
Helpful Hints for Both Variations
- Keep the erector muscles of your back engaged—you should feel the activation from the base of your neck all the way to the tip of tailbone. This will help you to pull your chest up off the floor.
- Reach your heart forward. Think about trying to direct your collar-bones towards the front of the room.
As mentioned before, the hand positioning in this posture is quite different from most other postures in yoga. It might take a little while to get used to, so be patient with your body along the way and be aware of when it’s time to take a break and come back to it another time.