Downward-Facing Dog is undeniably one of the most well-known yoga poses, and probably one that you have come across many times, from beginner to advanced level yoga classes.
This three-legged variation of Down Dog (also jokingly known as Fire Hydrant Dog) is not only a great way to review the basics, but a way to challenge yourself to practice strong alignment with good humor and one leg up in the air!
Benefits Of Three-Legged Downward-Facing Dog
Downward-Facing Dog is one of the most well-known yoga poses for a reason—it can be done by almost anyone, and is an amazing stretching and strengthening exercise for the entire body.
It stretches the torso, strengthens the arms and legs, and rests and rejuvenates the brain. Three-Legged Downward-Facing Dog provides all the great benefits of Down Dog, but also stretches the inner and outer hip, side body, and improves balance.
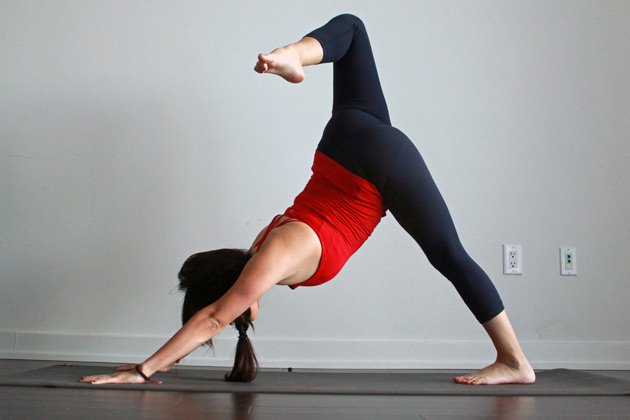
Three-Legged Downward-Facing Dog Pose Step-By-Step
- Begin in Tabletop Pose, on hands and knees, with your shoulders stacked directly over your wrists, and your hips stacked directly over your knees.
- Take a look down at your hands. Ensure that the creases of the wrists are parallel to the short edge of the mat, that the fingers are spread wide, and that the weight is distributed evenly through the palms and the knuckles, particularly of the pointer and middle finger.
- On an exhale, tuck your toes under and begin to slowly extend the legs, lifting the hips up high toward the ceiling. Keep the knees bent for as long as you need to here in order to maintain the length along the spine.
- Continue lifting the hips high and back, and press the tops of your thighs toward the back of the room. Keep your ears in line with your arms, and firm up through the upper outer arm.
- Remain in Downward-Facing Dog for three deep breaths, creating space in the legs and drawing the heels closer to the ground.
- On an inhale, extend your right leg up high and back, lifting it up toward the ceiling. Avoid the tendency to tilt the pelvis and open up through the hips immediately in an effort to lift the leg as high as possible; rather, keep the hips level with one another and the right foot flexed (with the heel reaching back and the toes pointing down toward the ground).
- You can remain here with the hips level if this feels like enough—or, to move even deeper, begin to bend your right knee so that your foot drops over to the left. Point your bent knee up toward the ceiling and begin to open up and stack your hips directly on top of one another.
- The weight will want to shift into the left side here. Keep the weight evenly distributed across both palms and drop the right shoulder so that the upper body remains squared.
- Stay in the pose for five to ten breaths, then slowly square off the hips and lower the extended leg on an exhale. Gently walk out the legs in Downward-Facing Dog, then repeat on the other side.
Tips
- It doesn’t matter whether or not your heels can touch the ground in Downward-Facing Dog. The key action here is to lengthen evenly through the spine and legs. Forcing the heels down rounds the spine and compromises the alignment of the pose. If you like, you can try placing a rolled up yoga mat or blanket under your heels to provide some extra support.
- This variation of Downward-Facing Dog is great for runners and cyclists, who usually have notoriously tight hips and legs.
- As you begin to lift the leg in Downward-Facing Dog, imagine there is a straight line that is drawn from the outer edge of your arm all the way up your leg. This may help with your alignment.
- Don’t forget to breathe!
Image Credit: Julia Lee